👍 MongoDB <> VS code project --- Connection Establishment
👉 In this blog lets go across the steps involved in connecting the VS code project to the mongo DB.
👉 Before starting the process make sure you have:
1. VS Code.
2. Mongo DB instance running in the local machine.
3. Signed into the MongoDB Atlas
[If you haven't signed in use the following link and sign in for free]
https://www.mongodb.com/cloud/atlas/efficiency?utm_source=google&utm_campaign=gs_apac_sri_lanka_search_core_brand_atlas_desktop&utm_term=mongodb%20atlas&utm_medium=cpc_paid_search&utm_ad=e&utm_ad_campaign_id=12212624368&gclid=Cj0KCQjwppSEBhCGARIsANIs4p7CpEcFIqqnN-57Y3VyLCzNZa5rOsCISYZPPA0GDO1ha-MPTxPgTmYaAsbuEALw_wcB
4. Have node JS installed in the machine.
5. MongoDB Compass.
🔆 Make sure you have these materials installed and signed up before you start the project. In case we need to install any other package or sign into other application, stay focused throughout the process to grab them
👉 STEP 01 - Setting VS Code environment.
* Create a folder in the project directory and name it as 'server'.
* Then navigate to the server folder in the VS code terminal and type 'npm init'.
* A init project will be created in the server folder.
* Then install ExpressJS and mongoose by issuing the command: 'npm install express mongoose'
* Then create the 'index.js' file in the server folder.
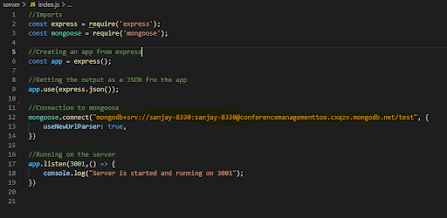
* Type the following code in the index.js file
 |
| The VS Code image |
*
Here the highlighted link is the step 2 : So How to get that link? lets discuss that in step 2 elaborately.
👉 STEP 02 - Setting up things in MongoDB Atlas.
* As the initial step sign in using the email and the password.
* Then create a new project by giving a name for the project.
* Then after creating the project you have to create a cluster in the project.
* Then select the free cluster and then choose the cloud storage along with county (Make sure you choose a county with free storage fee) and provide a cluster name. Finally the cluster is created.
* The below images shows the windows needed for a successful cluster creation.
*
After creating the cluster you have to select the users who have database access.
* Create a database user with a username and password as follows.
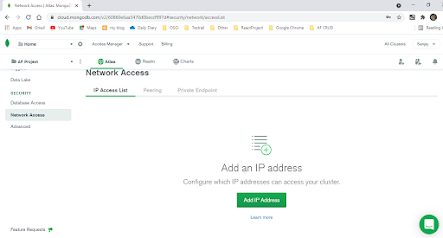
* After creating the user for database access then select the network access from the project homepage. Here you have to specify from which device/location you are accessing he database.
*
Now we have created a user for the database and the access location/device of the database.
* Now go back again to the project-cluster homepage.
* Click on the connect tab.
1. We should connect the database with the application.
2. We connect the database with the MongoDB compass for monitoring the database.
👉 STEP 03 - Connect the database with MongoDB Compass.
* Click on the connect tab as mentioned in the above image.
* You are launched at the following window.
* Select connect with 'MongoDB Compass'.
* Since you have MongoDB Compass installed in the machine copy the link to connect the database.
* Paste the link in the MongoDB Compass (New Connection).
* You can see a part in the link mentioned <password>.
* Erase that and type the password you have been given for the database user (One you created before with a Username and Password).
* That's it, now you have successfully connected your database to MongoDB Compass where you can monitor easily.
👉 STEP 04 - Connect the database with VS Code project.
* Now select the 'connect with application'
* You get a link, copy that as before.
* Paste that link in the highlighted part in the below code.
* Make sure you give the password of the database user as before.
* That's all now you have the database connected to your MERN project.
* Note that the main steps are mentioned for the demo purpose but you can explore more.
* Stay tuned for the next blog on creating schema on MongoDB from vs code project.


No comments:
Post a Comment