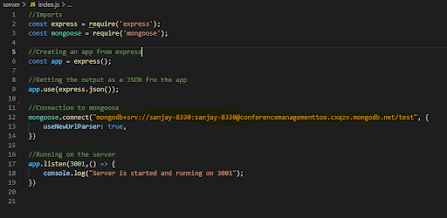
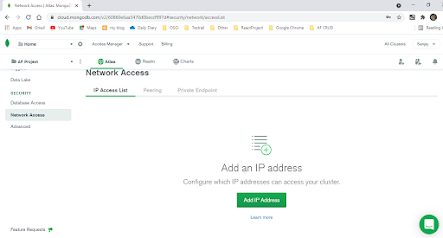
👉 Hope you have read and tried out connecting mongoDB with your application through the steps available in my previous blog post.
👉 Today lets move one step forward and create the backend services [without the frontend UI] and execute them through postman.
👉 Lets follow the same procedure of listing the steps in point form which is easy to catch-up things.
👉 Pre-conditions to start the project.
1. VS code installed in the local machine.
2. Node JS installed in the local machine.
3. Installed MongoDB with MongoDB Compass into the local machine.
4. An instance of MongoDB running in the local machine.
5. Have a cluster created in the MongoDB Atlas with the current IP address active in it [Refer the previous post to set the current IP address in the network access in cluster.
👉 Now lets get started.
🔑 Step 01 - Setting up the folder.
* Create a folder in the desktop or any subdirectories.
* Open the folder in VS code.
* Create another folder called 'backend' below the main folder using command 'mkdir backend'.
🔑 Step 02 - Installation of necessary packages and libraries.
* Open a new terminal.
* Run the command 'npm init' and create a init project.
* Then run the command 'npm install express mongoose'. This command installs express and mongoose into the init project.
* Then run the command 'npm install nodemon'. This command install nodemon which is useful to auto-save the changes to the server without stopping and restarting it.
* After installing the nodemon navigate to 'package.json' and edit the 'scripts' tag as following.
"scripts": {
"start": "node app.js",
"devStart": "nodemon app.js"
}
* Finally install cors in order to handle JSON inputs and outputs by issuing the command 'npm install cors'.
* After installing all these packages and libraries the 'package.json' file looks as shown below.
{
"name": "server",
"version": "1.0.0",
"description": "",
"main": "index.js",
"scripts": {
"start": "node app.js",
"devStart": "nodemon app.js"
},
"author": "",
"license": "ISC",
"dependencies": {
"cors": "^2.8.5",
"express": "^4.17.1",
"mongoose": "^5.12.7",
"nodemon": "^2.0.7"
}
}
🔑 Step 03 - Creating the schema.
* Now lets create a schema (table) in MongoDB named as 'Student'.
* First, create a folder inside the main folder named 'model'.
* Create a file named 'Student.js' inside the model folder.
* Type the following code inside the Student.js file.
const mongoose = require('mongoose');
const StudentModel = mongoose.Schema({
studentName: {
type: String,
required: true,
},
studentFaculty: {
type: String,
required: true,
},
});
const Student = mongoose.model("Student",StudentModel);
module.exports = Student;
* This code creates a schema names 'Student' inside the DB created inside the cluster.
* The Student schema has 'studentName' and 'studentFaculty' as the columns.
🔑 Step 04 - Connecting to MongoDB cluster.
* Now create a file named 'index,js' inside the 'backend' folder.
* Type the following command to connect to the database.
onst express = require('express');
const mongoose = require('mongoose');
const cors = require('cors');
const app = express();
app.use(express.json());
app.use(cors());
/**The Database connection */
mongoose.connect("<Link of MongoDB cluster for connecting with the application>", {
useNewUrlParser: true,
useUnifiedTopology: true,
useFindAndModify: true,
});
app.listen(3001,() => {
console.log("Server is started and running on 3001");
});
*
* These are the main steps involved in setting up the backend. Now lets perform HTTP requests (GET, POST, PUT and DELETE).
🔑 Step 04 - POST Method - Adding a student.
* The following code shows the import the schema to 'index.js' file.
/**Importing the model */
const StudentModel = require('./model/Student');
* Type the following code to perform the POST functionality.
/**Post - Add Student */
app.post("/insertStudent", async (req, res) => {
/**Provide same name as per the column name */
const name = req.body.studentName;
const faculty = req.body.studentFaculty;
const std = new StudentModel({
studentName: name,
studentFaculty: faculty,
});
try{
await std.save();
res.send("Inserted Data!!");
console.log("Data inserted successfully!!!");
}catch(err){
console.log(err);
}
});
🔑 Step 05 -GET Method - Getting student details.
* The following code can be used to get the student details.
app.get("/readAllStudents", async (req, res) => {
StudentModel.find({}, (error,result) => {
if(error){
res.send(error);
}
res.send(result)
})
});
🔑 Step 05 -GET Method - Getting particular student detail by id.
//Read student details by ID
app.get("/readStudentById/:id", async (req, res) => {
const id = req.params.id;
StudentModel.find({_id:id}, (error,result) => {
if(error){
res.send(error);
}
res.send(result)
})
});
🔑 Step 06 - PUT Method - Update particular student detail by id.
//Update the workshop details
app.put("/updateStudent", async (req, res) => {
const studentName= req.body.studentName;
const studentFaculty= req.body.studentFaculty;
const id = req.body.id;
try{
await StudentModel.findById(id, (err, updatedStudentObject) => {
updatedStudentObject.studentName= studentName;
updatedStudentObject.studentFaculty= studentFaculty;
updatedStudentObject.save();
res.send("Student detail Updated Successfully");
});
}catch(err){
console.log(err);
}
});
🔑 Step 06 - DELETE Method - delete particular student detail by id.
/**Delete the student details from the student Schema for given student ID */
app.delete("/deleteStudent/:id", async (req, res) => {
const id = req.params.id;
await StudentModel.findByIdAndRemove(id).exec();
res.send("Deleted Successfully!!!");
console.log("Deleted Successfully!!!!");
});
* After writing all the above code run the command 'npm run devStart' in the terminal.
* You should see the following output in the terminal.
> server@1.0.0 devStart C:\Users\HP\Desktop\Assignments\DS Assignments\Services\Product Service\server
> nodemon app.js
[nodemon] 2.0.7
[nodemon] to restart at any time, enter `rs`
[nodemon] watching path(s): *.*
[nodemon] watching extensions: js,mjs,json
[nodemon] starting `node app.js index.js`
Server is started and running on 3001
🔑 Step 07 - run in postman.
* POST Method.
HTTP Method : POST
URL : https://localhost:3001/insertStudent
Body :
{
"studentName": "Raj",
"studentFaculty": "IT"
}
* GET Method
HTTP Method : POST
URL : https://localhost:3001/readAllStudents
* GET Method - By id
HTTP Method : GET
URL : https://localhost:3001/readStudentById/<id>
* PUT Method.
HTTP Method : PUT
URL : https://localhost:3001/updateStudent
Body :
{
"studentFaculty": "SE"
}
* DELETE Method - By id
HTTP Method : DELETE
URL : https://localhost:3001/deleteStudent/<id>
😊 These are the main steps involved in creating the backend with REST API and MongoDB. Hope this blog helped you to get an overview about setting up the backend in a MERN project.
[Stay tuned with the blog posts for further updates in the MERN project].


